REC Release 3 Upgrade Notes: 6th June 2014 (DDay 70th Anniversary!)
Overview
Release 3 is a major update to REC with the following key new features:
-
Release 3 is a major update to REC with the following key new features:
-
Daily Update System Introduced
-
Look & Feel Changes To Page Manager, Blog Manager, User Home & Login Pages
-
New Guest Blogging With Publishing Permissions
-
Email Tracking Statistics Introduced
-
Product “Enquire Only” Mode Available On A Per Product Basis
-
Automated Abandoned Cart Followup Emails Now Available
-
Automated Product Review Emails
-
Individualised Product Followup Emails For New Orders (Event Hooks)
-
Infinite Scrolling On Product Filter (like Twitter etc!)
-
Release 3 is a major update to REC with the following key new features:
-
Daily Update System Introduced
-
Look & Feel Changes To Page Manager, Blog Manager, User Home & Login Pages
-
New Guest Blogging With Publishing Permissions
-
Email Tracking Statistics Introduced
-
Product “Enquire Only” Mode Available On A Per Product Basis
-
Automated Abandoned Cart Followup Emails Now Available
-
Automated Product Review Emails
-
Individualised Product Followup Emails For New Orders (Event Hooks)
-
Infinite Scrolling On Product Filter (like Twitter etc!)
SEO / Search Engine Changes
-
SEO Canonical Tags To Avoid Duplicate Content Issues
-
Blocking Multiple Product Filter Generated URL’s From Search Engines
-
Control Indexing For Specific Types Of System/Generated Pages
-
SEO Canonical Tags To Avoid Duplicate Content Issues
-
Blocking Multiple Product Filter Generated URL’s From Search Engines
-
Control Indexing For Specific Types Of System/Generated Pages
Minor features also included:
-
Product Filtering Extra Setting For Sort etc
- Batch Products Processor Unset Manufacturers
- AddThis Social Sharing Tracking
- Verify Pinterest For Your Site
- URL Shortening
-
Product Filtering Extra Setting For Sort etc
- Batch Products Processor Unset Manufacturers
- AddThis Social Sharing Tracking
- Verify Pinterest For Your Site
- URL Shortening
Other Small Changes / Fixes
-
Delete all orders via Superadmin only job
-
Coupon discounts calculate correctly on assigned products/categories only
-
Downloads no longer display multiple times on a page when using download group permissions
-
Blogs no longer appear multiple times on a page when selecting a specific blog category
-
Email addresses in site setup split on semicolon without spaces needing to be around it
-
Page manager drag n drop IE9/10 bug fixed
-
Shop/search page URL’s changed from /shop.php to /search instead
-
Regions/counties ISO codes migrated to the database table
-
Slider next/previous buttons now display properly when multiple panels is use
We are pleased to announce that we have moved to an automated update system which
ensures you have the latest enhancements and software patches added to your site on a daily basis. This allows us to “drip feed” in new features as we add them, rather than waiting for big new releases each quarter.

Keeping You Informed: A new system update bar appears at the top of the Admin page informing
you of the latest feature that is available or other important news. Simply click the link to read full details on our blog page so you can take advantage of new functionality straight away.
Look & Feel Changes
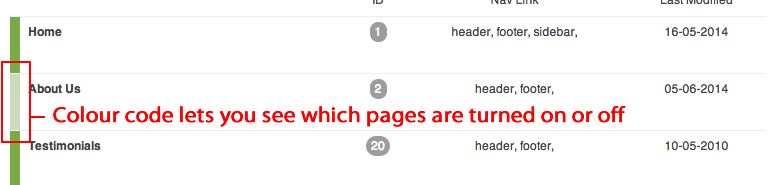
Page Manager: The layout has been improved so it is easier to filter / find pages, see their status
and when last modified.
-
Delete all orders via Superadmin only job
-
Coupon discounts calculate correctly on assigned products/categories only
-
Downloads no longer display multiple times on a page when using download group permissions
-
Blogs no longer appear multiple times on a page when selecting a specific blog category
-
Email addresses in site setup split on semicolon without spaces needing to be around it
-
Page manager drag n drop IE9/10 bug fixed
-
Shop/search page URL’s changed from /shop.php to /search instead
-
Regions/counties ISO codes migrated to the database table
-
Slider next/previous buttons now display properly when multiple panels is use
Look & Feel Changes
Page Manager: The layout has been improved so it is easier to filter / find pages, see their status
and when last modified.


Blog Manager: The layout has been significantly improved following the same style as Page
Manager, with a new filter field to let you find blogs more easily plus new settings which allow guest blogging with permission control (more about that later).

User Home Page & Login Page: You can now change more field labels on the User Home page
(the page users log into to view their account details, orders, change their delivery address etc) and the Login page. These are accessible via Set Site Definitions.
You can also better control the Login page by adding a new page called “Login” and this allows
you to choose if you have any page apps displaying on that page, rather than using the default apps you have on the Home page. Leave the page content blank and set the Page Status to off.
Permissions Based Guest Blogging
The Blog system has been extended so that you can now allow guest blogging on your site and
select the permissions for your guest blogger and which page they can blog on.
Blog Manager Settings: All settings for Blogs have been moved here from Site Setup.
These are the default settings for users not assigned into their own group:
Can ALL Users post blogs?
If ticked, then any logged in users can add their own blog posts via the User Home page.
Allow User To Set The Blog Status?
If ticked, then the user can set their blog post to either draft or live, otherwise their blogs are set
to draft and the site admin has to make them live. It is recommended you would only tick this if you have trusted guest bloggers.
Select Blog Category for users' Blog Posts
Blog posts by users will go into the selected category.
If a user is assigned into a user group, then you can set permissions specific to their group:

How To Set Up Guest Bloggers
Using this new functionality, the following steps will allow guest bloggers to add content to your
site:
1. Set up usergroups to group your bloggers into. If you want each blogger to be the only
one to post to a specific page then set up a usergroup just for that blogger using their name, for example.
2. Set up your blog categories into which bloggers will post. You can then assign this
category to a page later. If only one blogger is to post on that page then set up their own blog category.
3. Add the guest blogger as a user and assign them to the appropriate usergroup.
4. In Blog Manager Settings, set their group to be able to post or not (Can Post / Can’t
Post), whether they can set the publishing status of their post to Live (Allow Set Status) otherwise all their posts will be draft awaiting site admin approval, and to which blog category they will post to.
5. In Page Manager, add/edit pages where their blog posts will appear and via Sliders &
Page Apps select the blog category which will be displayed and you’re done setting up:

6. The guest blogger simply logs into the site as a user and, according to your chosen
settings, will be able to write and post blogs onto your site.
7. If you haven’t given them permission to set their publishing status, then their posts will be
drafts which you need to approve in Blog Manager. Use the filter feature to quickly find specific ones.
Email Tracking Statistics Introduced
You can now track the number of emails that have been sent out in a campaign, how many were
read and how many clicks you received. This counts all emails where images were loaded by the recipient. It only applies to campaigns sent since the Release 3.0.0 upgrade, not historical
campaigns.

To view this go to Email Manager and click on Sent Email Offers.
Product “Enquire Only” Mode
You can now set a product to enquire only mode by setting the flag “Push this product to enquiry only
mode?” on the product record Prices & Delivery tab. If you also tick “Hide Prices” then the visitor won’t be able to see the price on the site either (as they are stopped from adding the product to the cart where it would normally have shown):

This new field has also been added to the product import/export programs and the REC API.
Automated Abandoned Cart Followup Emails
Email Tasks has been extended to include the ability to send abandoned cart emails within a set
number of hours / days with your own subject line and content selected from a page you set up in Page Manager.

Automated Product Reviews / Reorder
Send automated product review emails to buyers to prompt them to leave more reviews on your
site.
First via Page Manager, set up your product review page which will be used to remind the buyer
to leave a review. Include the product details tag {{ products_bought }} in the body of your email; this contains a list of the purchased product(s) for that order with a link to click to leave a review
against each order. For reordering,
include the tag {{ products_bought_reorder }}
In Email Tasks, set up a new task with the Event: New Order. Select the page you set up
previously for the email content and set how many hours / days before the email goes out. It is recommended that you set this to 3 7 days dependent upon your delivery timescales.
Individualised Product Followup Emails For New Orders (uses Event Hooks)
(Note: this feature is not currently compatible with product reviews)
Set up automated product-specific
followup emails for each product on a new order, where the content of the email can be customised for that specific product as set on the product record. For example, if you sell products or services which expire / need to be replaced at the end of a set period or may need a warranty extension or retraining course, then this is the perfect solution.
For each product: via Page Manager, set up the content pages for each specific product with the text / products you wish to promote e.g. warranty extension, repeat training course, replace your tyres etc.
Also set up a default product followup page: you need to set this up via Page Manager too, it’s
here in case none of the products on an order have been set up with individual content, in which case a single email covering all products.
NB: In the situation where one or more of the products on that order have been set up with
product-specific
content, individual emails will be sent for each of those products, pulling in the page content set on the product record. The remaining products on the order will not be included in the “default” email which becomes suppressed.
Via Products Manager, on the individual product Main Details tab, select the individual content
page in the Event Hook Page field.

Set up an Email Task for a New Order and select the default page you set up previously,
together with the hours / days before the email(s) are sent out. The system timer will then send out emails according to the entered period.
Infinite Scrolling On Product Filter (like Twitter!)
You can choose to use “infinite scrolling” for products using the Product Filter system, so when
the visitor scrolls down a page of products, rather than getting page numbers to click on and see the next page, the products load automatically so the visitor just keeps scrolling to see them all.
This is a neat feature you see on sites like Twitter. To enable/disable this feature, go into Site
Setup > Website Display Elements > Use infinite scroll on product filter.
SEO Canonical Tags To Avoid Duplicate Content Issues
This is an SEO enhancement which ensures that different URL variations of the same product
are treated as a single product by search engines to avoid duplicate content issues. You do not have to take any action, this is automatically resolved by the REC system.
Blocking Multiple Product Filter Generated URL’s From Search Engines
If using the Product filter feature, you now have the ability to stop the multiple URL’s generated
from the product filter (e.g. product-size-colour)
from being submitted to search engines. This
creates a cleaner profile of indexed pages in search which some site administrators might prefer, although it is likely to lose web traffic if put in place. We recommend not turning this on at present.
To enable it go to Site Setup > Robots.txt > Hide URLs containing /productfilter/from Search Engines
Control Indexing For Specific Types Of System/Generated Pages
In Site Setup > Indexing you can now switch indexing on/off for certain types of system and
system-generated
pages:
Index Search/Tag Pages
Index Login/Register Pages
Index Cart/Checkout/Thanks Pages
We recommend the last 2 are unticked. Search/Tag pages are best left ticked as these will help
generate more traffic to the site.
Product Filtering Extra Settings For Sort etc
You can now set the default sort order for product filter pages e.g. Price high to low. Set this via
Product Filters App Manager, set the field Default Sort accordingly.

We have also improved how product filter displays the price summary so it uses proper
currency format e.g. £1,000, and there is an intelligent override so that if you set minimum and maximum values on a Price Range block, the system will adjust this based on the actual product values that fall within that range if Auto Set Range is ticked e.g. range £1,000 £5,000 would become £1,020 £4,995 based on the lowest and highest priced products you have in that range.

Batch Products Processor Unset Manufacturers
You can now unset manufacturers to a blank value (rather than “none”) where they have
previously been set. Go to Batch Products Processor > Process Selected Products > Manufacturer field set to “-”

AddThis Social Sharing Tracking
If you are using the AddThis social sharing button on your site, you can now set up your own
AddThis account at http://www.addthis.com/ and track your AddThis social shares.
Set up your AddThis account and get your verification code e.g.
Go into Site Setup > Integrations > AddThis > Addthis Profile ID E.g. ra507576385842d127
Verify Pinterest For Your Site
This is a security feature which allows you to verify you are the owner of your site when you set
up your Pinterest account. It does not currently give any other interaction with Pinterest at present, it is purely to satisfy their account creation / verification process.
First of all sign up for a Pinterest account and get the verification code (the bit in the quotes e.g.
8278b57541cf3f53dc664a4d39d6a14c)
In Site Setup > Social Media, enter this code into the field Pinterest Website Validation Meta Tag:
Back in Pinterest, verify your account now the tag has been saved in your site.
URL Shortening Options
You can now create a shorter URL link when sending your posts to social media, which leaves
more room for your actual message content. The choice is TinyURL, Bit.ly or none. Set this up via Site Setup > Social Media > URL Shortener.
If you use Bit.ly, then you need to also go to Connect > Bit.ly and connect via either one of your
social media accounts or your bit.ly account (sign up first of course). Bit.ly also allows tracking but at a charge.